Breaking

Sunday, April 26, 2020

April 26, 2020

WhatsApp: How to Send Messages Without Saving Number

Whatsapp is an application that is on everyone's phone nowadays. You are as far as saving a number to talk to anyone. But sometimes it can be quite irritating and annoying when we have to talk to someone for a few messages only and for this we have to save their number. So today in this blog I will tell you how you can directly message anyone on WhatsApp without saving numbers.

whatsapp-without-saving-number
Send WhatsApp Message Without Saving Number
This trick is useful in another situation. Most privacy settings in WhatsApp have only two options - Everyone and My Contacts. Now you may not want that any random person with whom you would talk only once or twice, see your profile picture. Sending WhatsApp Messages without saving numbers will help you here.


How To Send WhatsApp Messages to Unsaved Number

The following trick is for both Android or iOS Users. All you need is to follow the steps given below and you will be able to do the said task.

  1. Open your phone's web browser ( Google Chrome will be preferable ) and type or copy this link in the URL or Address bar: http://wa.me/xxxxxxxxxxxx or you can also use this one: http://api.whatsapp.com/send?phone=xxxxxxxxxxxx
  2.  Replace all the "XXXX..." with the recipient's phone number along with his country code. Now if you want to message on +919901111111 ( 91 is the Country Code of India and 9901111111 is the phone number) then the link will be: http://wa.me/919901111111
  3. Make sure that the number you entered has a WhatsApp Account
  4. After typing the link, tap on Enter to search.
  5. A new WhatsApp webpage will be open displaying recipients' phone numbers and a Green message button.
  6. Tap on the Green button and you will be then redirected to WhatsApp
  7. Chat will be the said contact now will be open. That's all, now you can message that person without adding him to contact.


whatsapp-without-adding-to-contact

Should You Use Third-Party Apps to Send Messages To Unsaved Number?

There are many applications on the Play Store that help will help you to do the above task, but, In my opinion, you should not use them. Using such unknown applications may compromise with your data and privacy. They can also lead to your Whatsapp account being banned. That's why when all the work can be done internally, then what is the benefit of loading and using any other application.

Conclusion

WhatsApp is a very interesting messaging application with lots of Tips and Tricks available and is very easy to use. If you do all the steps mentioned above correctly, you will not only be able to WhatsApp Message anyone without saving their number, but you will also be saved from the danger of using any third-party application.


See Also :


If You found this post "WhatsApp: How to Send Messages Without Saving Number " Useful, please do share with your friends, Follow DroidMing on Different Social Media and stay connected for more Tips, Tricks, and Tech-Related content.

PEACE

Sunday, April 12, 2020

April 12, 2020

15 Ultimate Battery Saving Tips For Android Phones (2020)

Smartphones have become an indispensable part of our life, but the battery life is as important as the smartphone itself. A smartphone having good battery life enhances the user experience. In this article, you will find about the best battery saving tips for android phones.

You can extend the lifespan of your phone battery in two ways :
  • By charging it properly
  • By using General Tips while using smartphones

How to Increase the Battery life of Android Phones: Understanding Charge Cycle


battey-saving-tips-android


Mass of people thinks that the way we charge our Android Phones doesn't impact the Overall life of the battery. We charge them in any way we want, but that's definitely not the case. How you charge your phone will decide the overall lifespan of the battery

Charging Cycle indicates how many times a rechargeable battery can undergo the process of complete charging and discharge until failure or it starting to lose capacity.

In simple words, it means full discharge and charge of the battery from 0 to 100%. Charging from 50 to 100% will imply half charge cycle, doing this twice and it will be a complete charge cycle

There is battery degradation upon every charge cycle. Battery manufacturers say that after 400 complete charge cycle, the phone battery is degraded by 20%, means that 20% of capacity is lost and 80% remain further.

So you saw, how charging is crucial for the overall life span. If you can slow down those charge cycles — you can extend the everyday battery life of your phone — you can extend its battery lifespan also.

Best Battery Charging Tips for Android Phones

We all use smartphones, and observe that battery seems to get worse over the period of time. Everything degrades one day and so is the case with Batteries, but it is partially our fault also


battey-saving-tips-android
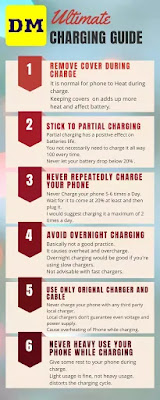
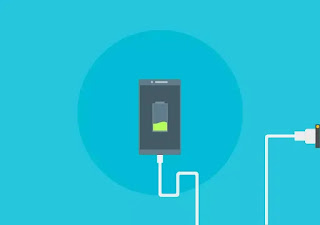
Charging Guide

Many of us charge in the wrong way, and that’s why our battery doesn’t long last. You must use the following tips to make sure you do it in the right way.

1. Remove Cover and Cases During Charging

Phone case and cover protect your phone from damages but using them while charging obstructs proper heat dispersal. Heat is the biggest enemy of a phone's battery. Charging a phone itself generates some heat but when a phone is charged with cases and covers on, it generates even more heat.

2. Stick to Partial Charging

Android Phones nowadays uses lithium-ion batteries and partial charging has a positive effect on their life. Batteries are neither happy at extremely lower levels nor at the extremely higher levels. You not necessarily need to charge it all way 100 every time.

battey-saving-tips-android
Always Go with Partial Charging
If it is charged for like 80%, it is sufficient. Battery drops to 30% charge it to 80 or 90% and that's it. One thing is to keep in mind that never let your battery drop below 20% as it impacts performance very badly. Always try to keep it above 20%.

Using partial charging can extend battery life by about 15-25%.

3. Never Repeatedly Charge your Phone

Some of us have a habit of charging our phones 5 to 6 times daily, but the point is if you have charged your phone, let the battery do the work it is meant for. Use it for the day. Continuously charging your phone adds up to the charge cycles and you know how it impacts the overall life span.

Wait for it to come at 20% at least and then plug it. I would suggest charging it a maximum of 2 times a day, however, it also depends on which type of user you are.

4. Avoid Overnight Charging

Most of us prefer to plug our phone for an overnight charge but it's not a good practice. If it has reached full, there's no point in keeping it plugged-in.

Overnight charging would be good if you're using slow chargers like 8W or 10W, but it is not advisable to do if you're having fast chargers like 20W or 30W as it causes overheat and overcharge.


battey-saving-tips-android
Avoid Overcharge Of Phones
However, this thing is a debatable question. Some say that smartphones are smart and are able to maintain power supply throughout. On the other hand, some say it damages battery due to overheating in the long run

5. Use Only Orignal Charger and Cable

Never charge your phone with any third party local charger. If in any case the original charger is damaged or broken, buy a new original branded one. Local chargers don't guarantee even voltage and power supply into your smartphone and can cause many consequences like :

  • Cause overheating of Phone while charging.
  • Damages battery life.
  • It can also lead to an explosion of your phone. ( Phone explosions are mainly due to using third party chargers)
Cables are equally important as the chargers or adapters are. So use Orignal cable also

6. Never Heavy Use your Phone while Charging

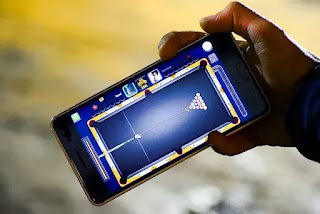
Give some rest to your phone during charge and then use it. While charging it is already performing a task and how much it will perform simultaneously. Light usage is fine but using it extensively during charging ( playing high-end games along with multi-tasking) will damage its battery and distorts the charging cycle.

battey-saving-tips-android
Do not play games while charging
There had been cases where phones had exploded while charging.

7. Charging Phone with High-Watt Charger

Some people charge their phone with chargers of 20W or 30W even when their phone has the support of 15W or 18W only. They do it in the hope that their phone will charge very fast but it's not true. The phone will charge properly only when charged through the correct watt charger.

If you will use a very high watt charger it will not work because of the phone's hardware incapability. Instead, it will add excess strain which will not be good.

8. Suitable Charging Condition

Always charge your phone in a suitable atmosphere ( neither very hot nor very cold). Avoid charging your phone in hot places ( like in direct sunlight). It adds unnecessary strain during the charging process. Charge it in a normal place under normal room temperatures.

Best Battery Saving Tips for Android Phones

Apart from charging, there are some day-to-day tips that you can use to save battery on a daily basis or in an individual charge cycle.

9. Dark Wallpaper on AMOLED Screens

Users having a phone with AMOLED Display should use a black or dark color wallpaper in order to preserve a huge amount of battery. Amoled screen pixels that are black in color draw no power at all. 

battey-saving-tips-android
Dark Wallapers on AMOLED
So for al the black part on the screen, no battery is being used. This results in lower consumption of power and greater battery life

10. Brightness

" The brighter, the vibrant ", we all think so and due to this many of us keep our phone brightness at the max level all the time, which drains hell of power. 

The best way is to set your phone brightness manually ( Increase it when you're outside and decrease it when you're inside ). You can set it at Auto-brightness also, but then the light sensors will also consume some power. It would be negligible, but yes it will consume,
  

11. Software Updates

Don't upgrade your phone as soon as any new update comes. Sometimes there are minor bugs in the update which can cause an issue in the battery as well as overall device performance. Check online reviews and then upgrade it.

12. Killing Recent Applications

We think that removing an app from the recent tab will save our power as they will not run in the background but the thing is the exact opposite. When you erase an app from memory and you open it next time, the app loads from the starting instead of where you have left it. 

It uses more processing power and eventually uses more battery. Your phone software is well optimized for handling recent apps & memory usage, you don’t need to clear them manually.

13. Battery Saving Applications

Android OS had become so advanced that it does battery optimization to a great extent. It saves power as much as it can. Do not install any battery-saving applications. Instead of saving power, it results in increased power consumption as they always run in the background with many processes. It drains more oy your battery.

14. Screen Timeout

Leaving your display on is also one of the greatest battery killers. Screen Timeout is the time after which your smartphone goes into sleep ( the screen turns off ) after you have stopped using or interacting with it.

Try to keep it low as possible like 15 secs or 30 secs. Don't put it for a very long time like 5 minutes or 10 minutes. Trust me it will save you a lot of power.

15. Use Lite Versions of Application

This thing has a person to person aspect. Some like to use the original version of application while others use Lite Version. Lite version uses less power and resources in comparison to original ones.

So, I would suggest that if you're having an old smartphone with low hardware specifications, use Lite Applications. They will help you reduce power consumption.

But again it a person's individual choice

Conclusion

Putting all things together, you can achieve 20-25% power saving and at the same time extend the overall lifespan of your precious smartphone. Always make sure that :
  1. You charge your phone with the original charger and cable
  2. Adopt Partial charging. Remove cover when charging.
  3. Do not continuously charge your phone
  4. Use dark wallpapers on AMOLEDs
  5. Never Install any battery-saving application.
  6. Do not kill recent apps manually

Also Read : 
If You found this post "15 Ultimate Battery Saving Tips for Android Phones (2020)" Useful, please do share with your friends, Follow DroidMing on Different Social Media and stay connected for more Tips, Tricks, and Tech-Related content.

Which of the Tips or Tricks you were not knowing earlier. Tell me in Comments.. !!
  
PEACE

Sunday, April 5, 2020

April 05, 2020

Set Up Welcome Voice Message for PC on Windows startup (2020)

Would you like that your PC welcomes you when it starts up? In this blog, I would like to showcase the steps through which you will be able yo set a Welcome Voice Message for PC on Windows Startup.

Adding Welcome Voice on Windows Startup for PC

By adding the Voice Message, You become different from Normal User. You proceed one step further to be a Power User. When you will start your PC or Laptop in Public, I am sure people's gonna be amazed after hearing this they will definitely ask you what was that and how you did that. You kinda get Jarvis Type feeling (maybe).


Welcome-Voice-Message-for-PC


The Given process involves the creation of some files, adding some codes into it and moving them to the desired folder along with some tweaks, but don't worry all these are very simple.

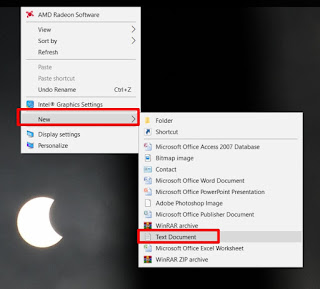
Step 1: Creating a Text Document

The First step involves creating a text document. Go to your desktop, right-click on it, move over new and then click on "Text Document". An empty text Document will be created on Your Desktop. This will be our main workplace where we will write our code.


Welcome-Voice-Message-for-PC
Creating a new Text Document

Step 2: Adding Code To Text Document

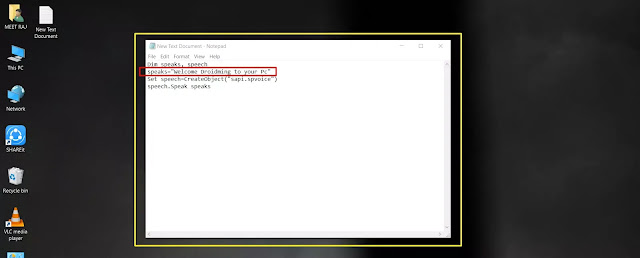
Next, we have to open the text file that was created earlier. In this file just copy the code that is given below :

Dim speaks, speech
speaks="Welcome Droidming to your Pc"
Set speech=CreateObject("sapi.spvoice")
speech.Speak speaks

Welcome-Voice-Message-for-PC
Copying the code into Text File
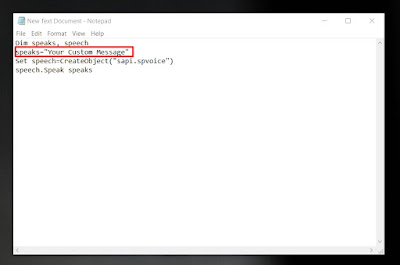
 In the Second Line, In Place of DroidMing (ignore quotes), just add up Your Name

However, it is not compulsory to add this message only. You can set any custom message of your choice as Welcome Message For Startup. To do so, type in your desired custom message in between the Quotes in the second line of Code.

Welcome-Voice-Message-for-PC
You can also add Custom Message

Step 3: Saving the File with .vbs extension

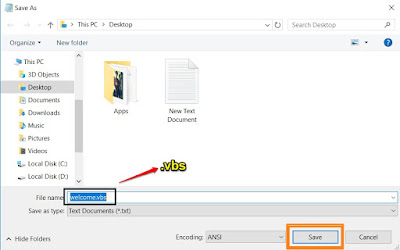
After you have added the code, it's now time to save the file. But here it involves an important step. we have to save the file with an extension name called .vbs

Click on File and then choose the "Save As" option. Give any name to the file, and add .vbs to it, and then save it.
Welcome-Voice-Message-for-PC
Saving the file with  .vbs extension
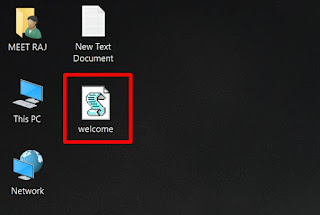
A new File will be created on the Desktop ( In case you haven't change the saving Position). We have to move it to a Designated Location

Step 4: Moving the File

After the VBS file has been created, its now time to move it. There Are two ways to move the file into the location, First one through Run Command and another through navigating through Folders under Hard Disk Drives. Just copy the file and Proceed according to any one step that are given below
Welcome-Voice-Message-for-PC
New is created on the desktop
Read Also :

1.Run Command

This is easier, compared to the second one as it lands you direct to the destination folder.

Open Run Command Using WINDOWS+R shortcut key. In the Run Window type shell:startup and press Enter

Welcome-Voice-Message-for-PC
Type in Run Window -> shell:startup
Now you will land to the startup folder. select paste option from right-click menu or simply press CTRL+V


Welcome-Voice-Message-for-PC
Pasting the File Into Startup Folder

2. Navigating through Folders Manually

In this, we will manually go to our startup folder ( destination folder)

At first, we have to enable Show Hidden items. Go to your My Computer, Click on the view option from the Upper-left Corner and Check Hidden Items

Welcome-Voice-Message-for-PC
Enable To show Hidden Items
All the hidden folders will be available now.

Browse to Local Disk C: > Users > Default > AppData > Roaming > Microsoft > Windows > Start Menu > Programs > Startup

After you reach the startup folder, paste the VBS file that you have copied earlier.


Welcome-Voice-Message-for-PC
Paste The Folder

Step 5: Restarting the Computer

After you have pasted the file, you can now delete the text file as well as the VBS file from the desktop or move them to any other folder. Deleting them will be best. 

Restart Your System Now and Make sure that your system volumes are Maximum so that you can hear your Welcome Voice upon restart.

Disabling the Welcome Voice

Going through the above-mentioned steps, I am Pretty much sure that you would be able to set the welcome voice for PC and become a Power User.

In case you want to disable the feature, simply delete the file that you have pasted into the startup folder. You will then not hear the Message that you have set from next Boot-Up

Conclusion

Every other person now uses computers or laptops, Using Simple tricks like this, you get differentiated from the normal users. It's Just a Simple trick but when it is executed in Public, Most of the people gonna be Surprised. Not everyone PC's Welcomes its User, Does it?

If You found this post "Set a Welcome Voice Message for PC on Windows Startup" Useful, please do share with your friends, Follow DroidMing on Different Social Media and stay connected for more Tips, Tricks, and Tech-Related content.

What Custom Message would set as your Welcome Message? Tell me in the comments.

PEACE

Saturday, June 8, 2019

June 08, 2019

Google Keep Notes - Tips & Tricks you need to know (2020)

Are you in search of the simple and best note application? Google Keep is the one you were looking for. Here in this blog, I will guide you through the application and provide you with the basic but some awesome tricks of Google Keep !!

Google Keep Notes -Tips & Tricks you Might Don't Know

Google-keep-tips-tricks

There are many note-taking software and applications in the market, but Google Keep Notes holds a firm place in the top. Its interface is very simple but holds within it many awesome features that enhance the experience of making notes.

What is Google Keep?

Google Keep is a note-taking service developed by Google. It is available on the Web and has an application on different operating systems Like Android and iOS. On windows, you can access it online or you can add chrome extension of it.

Google Keep offers a variety of tools and features to take notes including pictures, drawings, audio, list, etc. You can create a checklist, change the color of notes, set a reminder and many more thing is discussed below.

Google-keep-tips-tricks
Google Keep Interface

How to access Google Keep?

For Web users :

First of all, open your web browser and sign in into Google using your Google Account. At the Google homepage, click on the grid icon beside the images option. A list of Google services will open, scroll down below and select the Google Keep Option

A Chrome Extension of the same is also available, To add it (Click here) 
--------------------------------------------------------------------------------------------------------------------------

Read Also: Google Chrome Dark Mode Update For Android | Here How to enable it

--------------------------------------------------------------------------------------------------------------------------

OR, You can Directly open it using the following URL: https://keep.google.com/

For Android Users :

You can download and install Google Keep App from the Android Play Store. To take notes simply open the Notes application and write in it.

To download Google Keep App on your android click the download button below :

For iOS Users :

To download it, go to your App Store and search for Google Keep an install it.

How to use it: Features, Tricks, and Basics

Using google keep is almost the same in different platforms the only difference is that, that in android we tap on the options and in web or windows we click the option with mouse. The placement of all icons is almost the same. In this post, I will illustrate you using  Google Chrome On Pc

Take a Quick Note

In order to take a quick note just click on the Take note bar and write the notes, you want.

Google-keep-tips-tricks
Take a Note
 After you have finished writing just Click anywhere on the screen and your note will be saved.


Google-keep-tips-tricks


There is not any save option in google keep. Its just Work Like Sticky notes features of windows. As you finished writing it is saved automatically

Pin, Drag and Drop Notes

You can prioritize your list of notes by Pinning them. you can Pin the most important ones at the top. In this way, you can create a to do with your notes also.

To pin a note, Move over your note and select pin Icon.
Now your Note Will be Pinned at the very top.
Google-keep-tips-tricks
Pin Icon at the Top Right Corner
You can also Drag and Drop your note in the order you want. This will help to prioritize the ones that you are needed to do first and others serially 

Set a Reminder For Your Notes

It's even better when you are reminded about your Work. The Reminder Option of Google Keep here's come into the play.

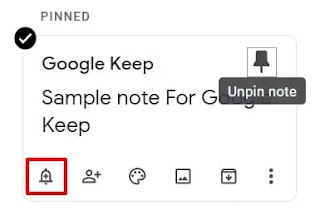
To add a reminder for your note click on the Reminder Icon

Google-keep-tips-tricks
Reminder Icon at the lower-left corner
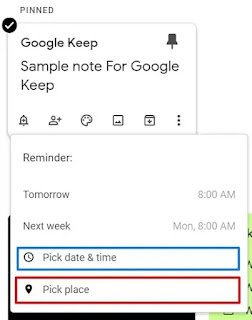
In Google Keep, you can set a reminder of two types

1. Date and Time Reminder: After you click on the reminder option choose Pick date and Time. Specify the required date and time and click on save


Google-keep-tips-tricks
Different Options Of Reminders
You will receive notification about your note on the desired time and date

2. Location-Based Reminder: Suppose you have to buy something from the near place or you have to attend an event of which you have created the note. So, by adding a Location as a reminder you will get notified when you are near that location and below the notes, location will also appear

To add a Location-based reminder click on the Reminder icon and select Pick a Place. Enter the location and Choose Save.

Sharing Your Note

You can also share your notes with your friends or family. Changes made in your note will be also shown in the shared notes (vice-versa).

To share a note click on the Collaborator Icon ( right to the Reminder Icon) and enter the email address of the person. Choose Save.

Google-keep-tips-tricks
Share your Notes with The Collaborator Option

Your Note will be now shared with that person(s)

Colour of Your Note

To change the color of your note click on the Change color Icon and choose a Background Colour for your note

Google-keep-tips-tricks
Colour Notes
 By assigning different colours for note, You can categorize your notes on the basis of it

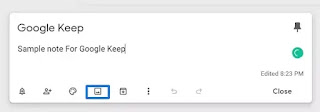
Add Images Along with Your Note

Sometimes you want to add an image that is related to your note along with the note.
To do so Click on add image option, browse your picture and press enter

Google-keep-tips-tricks
Add Images along with Your note
Your selected image will be set up above the note and will add more detail to it

Google-keep-tips-tricks
Your image is added at the top along with the note

Add Label, Drawing and Delete Note

Labels :

Labels are used to group notes of a similar type. For example, you can make a label like an office, home, work, etc.

To add a label click on three vertical dots and choose add label. Enter the name of the label and press enter. A label of that name will be created.

Drawings :

To add a drawing with your note click on the vertical dots and choose to add drawing option. Draw the required thing and go back. Same as in case of Picture your drawing will be set up at the top of your note

Delete a Note:

To delete a note, click on the three vertical dots and choose Delete Note

Create a CheckList 

With the Help of Google Keep, you can also create a To-Do list or Checklist.

To create a checklist, Choose the New List option ( Tick Option) from the Take a Note bar. 
In the next windows enter the list of things to make a checklist

Google-keep-tips-tricks
Checklist Option
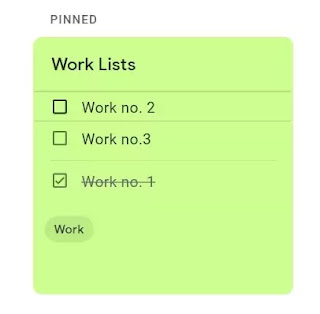
The feature of  Google keeps Checklist that I liked the most is Checking things off. Suppose you have a work list and your work 1 is completed. To check off the Work 1, simply click on the box before the work 1 and it will be crossed off and will go below the Undone Work.

Google-keep-tips-tricks
Checking Off Checklist
 You can check off the list items from the main menu and you don't have to open the notes each time to check things off.

Grab text From Image (OCR)

Have you ever heard about OCR? It is used to extract characters from an image. Google Notes also offers this Function. It will come into use when you have an image and want to make notes from the things written in it.

To do this, Click on New note with Image ( In the Take a Note bar).

Google-keep-tips-tricks
Add note With Image

Browse for the image and press enter. A new note with the image will be created. Click on three vertical dots and choose Grab text from Image Option

Google-keep-tips-tricks
Text is Extracted From the Image
All the Data from the Image will be now copied into the Notes

Conclusion

These were some basic functions of Google Keep Notes you might don't know earlier. Grab text from Image (OCR), Checklists, Images along with notes are some of the remarkable Tricks.

Using  these you can make your important notes even better and be able to organize yourself

How many features of Google Keep did you know earlier? Tell me in the comments.

If You found this post "Google Keep Notes - Tips & Tricks you might don't know earlier (2020)", Useful, please do share it with your friends and follow DroidMing on different Social media. Stay Tuned for more Tips, Tricks, and much more Tech-Related content.

PEACE
Monday, May 27, 2019

May 27, 2019

2 Ways to Do Automatic Shutdown In Windows (2020)

Learn how to Auto Shut Down PC  by using the feature of Automatic Shutdown in windows. Automatic Shut Down can be very useful in certain situations and a windows user must know these option

2 Ways to get Automatic Shut Down In Windows

Automatic Shut Down Is an element in windows through which windows shutdowns automatically after a period of time defined by the user. It can be a very useful attribute of windows in some of the situations.

automatic-shutdown-windows
Automatic Shutdown In Windows 10
There are many third-party software that does the same; But who needs extra software when the thing can be done in Internally

You can also do this with the Task Scheduler of Windows, But that process is quite long. By doing this from the Command prompt or Run command, it is much faster than that.

Why should Someone need Automatic Shutdown?

Suppose you are downloading something and estimated that downloading will be completed in about half an hour, but at the same time you have to go outside. How will you now shutdown your pc? Automatic Shutdown Features here comes into the play.

Maybe you are exporting a file or downloading something and want that your PC shutdowns after the task are completed, this feature will help you there also

It can be used not only this situation, although in many circumstances depending on the usage habits of the User

Way 1: Using The Run Window

This is one of the easiest methods of  Shutdown Timer. To do this First open the Run Window by pressing  Windows + R shortcut

In the run windows type the following command and press Enter :   

shutdown -s -t time in digits
(Note: Above Command will include blank Spaces)

automatic-shutdown-windows
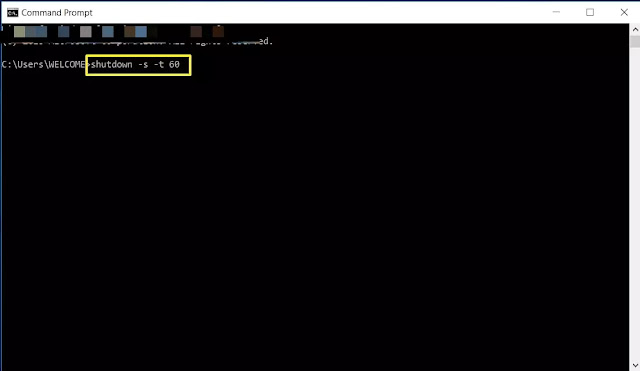
shutdown -s -t 60
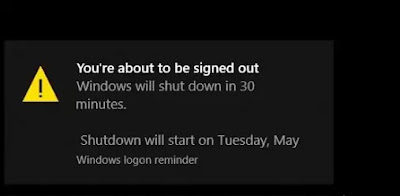
A message Dialog box Will appear saying that you will be signed out from windows in the entered time. After the time given in Message windows will shut down

automatic-shutdown-windows
Shut Down Timer Alert Message

Understanding The Command

Shut down: This is the main command which instructs the computer to shutdown
-s : This Instructs the PC to Shutdown
-t : It refers for time and we enter time in digits, after giving space

Example 1: Suppose I want to Shut Down Pc automatically after 60 seconds my command will look like this( Including Blank Spaces) :
shutdown -s -t 60

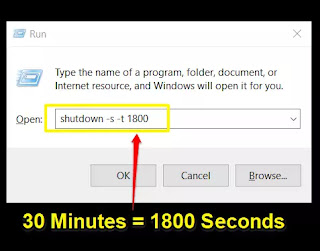
Example 2: To make windows Shut down In 30 Minutes( 1800 Seconds), Your Command Will Look Like This :

shutdown -s -t 1800
automatic-shutdown-windows
shutdown -s -t 1800

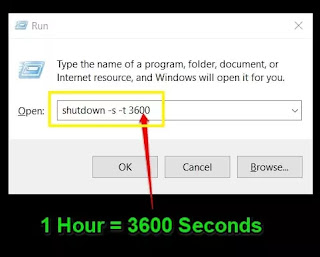
Example 3: To make windows Shut down in 1 hour( 3600 Seconds), Its command will be 

shutdown -s -t 3600

automatic-shutdown-windows
shutdown -s -t 3600
So, in this way, you can make your own shutdown timer by converting the time into seconds and using the commands accordingly

Way 2: Going the Command Prompt Way

In this method, the command will remain the same, however, we have to type it in the command prompt window

To open the Command Prompt, Search For "Cmd" in the windows search bar or open it by entering "cmd" in the run Windows( To open Run Windows Press Windows + R) and Enter.

After, When You are in the command prompt type the Same command and press enter. The same dialog box will appear again telling that you will be signed out from windows in the required time and after time, it will shut down

automatic-shutdown-windows
Message Appears When Auto Shut Down Timer Set For 30 Minutes


automatic-shutdown-windows
Message Appears When Auto Shut Down Timer Set For 30 Minutes

Abort the Automatic Shutdown In Middle Of Execution

If you need to stop the process of Auto Shutdown, you can also do that. Maybe you have more work or you have entered the wrong time. Whatever the reason you can also do that easily.

If you have adopted the Run command process, then open the Run window again and type in the following command: shutdown -a

If Command Prompt was chosen, then again open the Command Prompt and write the same command i.e, shutdown -a

Conclusion

There are many more ways to Shut Down PC automatically( you can use Third-party Softwares, but I founded these 2 ways very easy to do.  

By Using The Command Of Auto Shut Down one can schedule his windows experience to a greater extent. you will now no longer have to wait for the shut down of Pc. Use The command and Leave the PC if you have some other work and don't want to wait for it

It  also serves as a great trick to show to your friends and act Smart

For Which Purpose Would You guys like to Use Auto Shut Down? Tell me in  the comments

If You found this post "2 Ways to Do Automatic Shutdown In Windows (2020)", Useful, please do share it with your friends and follow DroidMing on different social media. Stay Tuned for more Tips, Tricks, and much more Tech-Related content.

PEACE